Qt is an excellent framework for developing cross-platform console and GUI applications. I have used the toolkit for developing a number of applications which are listed here on my website. I recently found myself faced with the task of developing a TCP server application which communicated with a set of clients in a secure fashion. Rather than reinventing the wheel, I decided to make use of Qt’s own SSL classes (QSslSocket for instance).
Creating a Self-signed Certificate
In order to establish a secure connection between the client and the server (and to ensure the client connects to the correct server), we will need to create an SSL certificate. Now, if you can afford an SSL certificate from a certificate authority (such as VeriSign or Comodo), I would highly recommend taking that route instead of the one I am about to describe. However, in my case, a self-signed certificate was more than adequate for the task at hand.
We will use the OpenSSL command-line application to generate the certificate (you can find Windows binaries here). Although I have only tested the commands on a Linux box (Ubuntu 12.04 in my case), they should (in theory anyway) work without any problems on a Windows box. Some of the commands below are borrowed from this page. As is stated on that page, I would highly recommend altering the permissions of the directory you will be storing the certificate in to prevent other users from being able to read the contents.
First, we need to create an RSA key. Enter a secure password when prompted to protect the key - you will need this password later to unlock the key.
openssl genrsa -des3 -out server.key 4096
The next step is to generate a certificate signing request. You will be asked for some information about the certificate - in our case, it really doesn’t matter what you enter for each of the questions.
openssl req -new -key server.key -out server.csr
Next, we create the actual certificate itself:
openssl x509 -req -days 365 -in server.csr -signkey server.key -out server.crt
For convenience, it would be nice to have a copy of the private key that does not require a password to be entered when used (this will make things easier for us when we develop the application below):
openssl rsa -in server.key -out server.key.insecure
Of course, as I mentioned before, be very careful with the private key - once someone else gets their hands on the key, they can impersonate your server and do some horrible things.
Creating the Qt Application
For the sake of efficiency, we will use Qt Creator to create a simple SSL-enabled HTTP server that returns a predefined message to connected clients. Begin by clicking File->New File or Project and selecting Qt GUI application. At this point you can safely just accept all of the defaults as you complete the New Project wizard. Once the wizard is complete, open the .ui file that was created for your project (it should be listed in the project tree on the left under “Forms”). You can remove the menu, toolbar, and statusbar since we won’t be needing them for our application. You will also probably want to set the windowTitle property of the main window (something like “SSL Server”, for example).
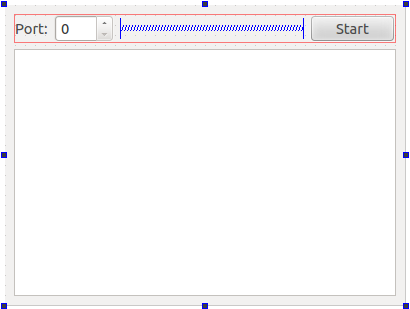
Drag a horizontal layout from the toolbox onto the window near the top and add a label, spinbox, horizontal spacer, and pushbutton (in that order) to the layout. You should have something that looks like this:

Change the text of the label to “Port:”. Change the minimum and maximum properties of the spinbox to 1024 and 65535 respectively. Lastly, change the text of the pushbutton to “Start”. Now drag a Plain Text Edit control to the main window underneath the layout. Right-click an empty part of the main window and select “Lay Out Vertically”. Your main window should look like this screenshot:

Now we need to create a couple of classes - one that implements a TCP server and another that derives from QSslSocket and interacts with the client. We do this by going to File->New File or Project and selecting C++ Class. The class will be named CSampleServer and will have QTcpServer as its base class. Repeat the same steps for another class named CSecureSocket that has QSslSocket as its base class.
If you attempt to compile the application at this point, you will run into a bit of a problem. We need to add Qt’s network includes and libraries to the project. This can be done by opening the project file in the editor (it’s the file that ends with “.pro”) and adjusting the line that begins with “QT +=” to the following:
QT += core gui network
(Notice the addition of “network” at the end.) Now the project should compile without error (though it won’t do anything useful when run).
Implementing the Server and Secure Socket Class
Open the CSampleServer.h header file and add the following private method to the class declaration:
void incomingConnection(int);
This method is a member of QTcpServer and is invoked every time an incoming connection is received by the server. Also, we will create a signal that emits a status message or error string to indicate progress or provide diagnostic information when something goes wrong:
void StatusMessage(QString);
Now open the CSampleServer.cpp implementation file and add the following include to the top of the file:
#include "CSecureSocket.h"
Add the following method to the bottom of the file:
void CSampleServer::incomingConnection(int handle)
{
    CSecureSocket * socket = new CSecureSocket(this);
    connect(socket, SIGNAL(StatusMessage(QString)), SIGNAL(StatusMessage(QString)));
    socket->Process(handle);
}
This method simply creates a new socket (using our CSecureSocket class) from the socket descriptor. Open the CSecureSocket.h header file and create a declaration for the following public method:
void Process(int);
While we have the header file open, also add a signal to the class declaration that looks like this:
void StatusMessage(QString);
We will use this signal to relay status information to the server (which in turn will relay the information to the main window). Next, open the CSecureSocket.cpp implementation file and add the following include to the top of the file:
#include <QHostAddress>
Now add the code for the Process method:
void CSecureSocket::Process(int handle)
{
    /* Emit a message indicating the address of the client. */
    setSocketDescriptor(handle);
    emit StatusMessage(tr("Incoming connection from %1.").arg(peerAddress().toString()));

    /* Set the certificate and private key. */
    setLocalCertificate("server.crt");
    setPrivateKey("server.key.insecure");

    /* Start the server encryption process and wait for it to complete. */
    startServerEncryption();
    if(waitForEncrypted())
    {
        emit StatusMessage("Session with client is now encrypted.");

        /* Respond with a basic HTTP message. */
        write("HTTP/1.1 200 OK\r\n"
              "Content-type: text/plain\r\n"
              "Content-length: 12\r\n"
              "\r\n"
              "Hello World!");

        emit StatusMessage("Message sent to client. Closing connection.");
    }
    else
        emit StatusMessage(tr("An error occurred: %1.").arg(errorString()));

    /* Close the connection once the data is written. */
    disconnectFromHost();
}
Hopefully the comments explain exactly what’s going on with each of the lines. Basically, we initialize the socket with the descriptor we received from the TCP server, tell the socket where to find our certificate and private key, begin negotiating the secure connection, and then write a simple, predefined HTTP response.
Connecting the Server to the GUI
As it stands now, we have a nice-looking GUI and a set of classes that process secure connections from clients. Now we need to tie the two together. Begin by opening the header file for the main window (probably named mainwindow.h, although in my case the file is named MainWindow.h since I have Qt Creator set to preserve case in filenames). Add an include for our TCP server:
#include "CSampleServer.h"
Add a couple of private slots to the class declaration:
void OnStart();
void OnStatusMessage(QString);
We will connect the first slot to the pushbutton and the second slot to the StatusMessage signal of the TCP server. Add a private member variable for an instance of the TCP class:
CSampleServer m_server;
Open the implementation for the main window and add the following to the end of the constructor:
connect(&m_server, SIGNAL(StatusMessage(QString)), SLOT(OnStatusMessage(QString)));
connect(ui->pushButton, SIGNAL(clicked()), SLOT(OnStart()));
The code for the two slots looks like this:
void MainWindow::OnStart()
{
    quint16 port = ui->spinBox->value();
    if(m_server.listen(QHostAddress::Any, port))
        OnStatusMessage(tr("Listening on port %1...").arg(port));
    else
        OnStatusMessage(tr("Unable to listen on port %1.").arg(port));
}

void MainWindow::OnStatusMessage(QString message)
{
    ui->plainTextEdit->appendPlainText(message);
}
You should now be able to compile and run the application. Be sure to run the application in the directory that contains your certificate and private key (you can run the application in a directory of your choice by setting the appropriate option in your project’s configuration page). Once the main window is displayed, you can select an unused port and click the start button. You should be able to point your browser to the following address and see our predefined message:
https://localhost:1024
You will need to replace “1024” with the port that the application is currently listening for incoming connections on.
My Browser Is Telling Me Something Is Wrong
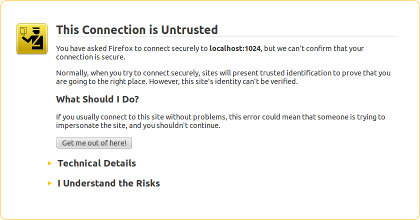
If you created a self-signed certificate using the steps above, you will likely see something like the following when you try to view the page (the screenshot below is from Firefox:

Any browser worth its salt will display some sort of error when a self-signed certificate is received since (in the wild) it represents a serious security threat. In our case, however, we have created the certificate ourselves and are using it for testing purposes. Most browsers offer some way to specify an exception or to ignore the warning. For Firefox, you can click “I Understand the Risks” and add an exception. After doing that, the page should display properly.
It should be noted that if you are developing a Qt-based client (or any language / toolkit that offers control over the way SSL certificates are processed when they are received), a self-signed certificate will be sufficient for ensuring secure communication and verifying that the client is connected to the correct server (assuming you safely guard your certificate and private key). As long as the client has the certificate fingerprint (or even a copy of the certificate) and verifies it against the certificate the server presents during the connection process, there is really no need to purchase a certificate from a certificate authority.