Yes, you read that right. In this article, I am going to detail the process of getting Debian 0.91 up and running in qemu on an Ubuntu 16.04 host. The adventure promises to be a fun one since Debian 0.91 was released in… 1994.
First Things First
In order to get this running, we need to install qemu itself:
sudo apt-get install qemu-system-x86 qemu-utils
We also need the installation files for Debian. They are not distributed as an ISO file but rather as floppy disk images. Thankfully, an archive of everything we need exists:
wget http://www.oldlinux.org/Linux.old/distributions/debian/debian-0.91.tar
tar xf debian-0.91.tar
Preparing the VM
From this point on, all of the files we will need are stored in debian/debian-0.91/dist, so let’s switch to it:
cd debian/debian-0.91/dist
Besides the installation disk images, we also need to create two hard disk images:
qemu-img create -f raw debian.raw 50M
qemu-img create -f raw packages.raw 50M
The first will be used for the root filesystem and the second one will be used for the packages we install.
Before we can use the floppy images, we need to decompress them:
gunzip base/basedsk1.gz base/basedsk2.gz base/bootdisk.gz
Launching the VM
We are now ready to start the VM:
qemu-system-i386 \
    -M pc \
    -boot order=ac \
    -drive file=base/bootdisk,if=floppy,format=raw \
    -drive file=debian.raw,if=ide,format=raw \
    -drive file=packages.raw,if=ide,format=raw \
    -serial msmouse \
    -vga std
If everything worked correctly, you should see this screen:
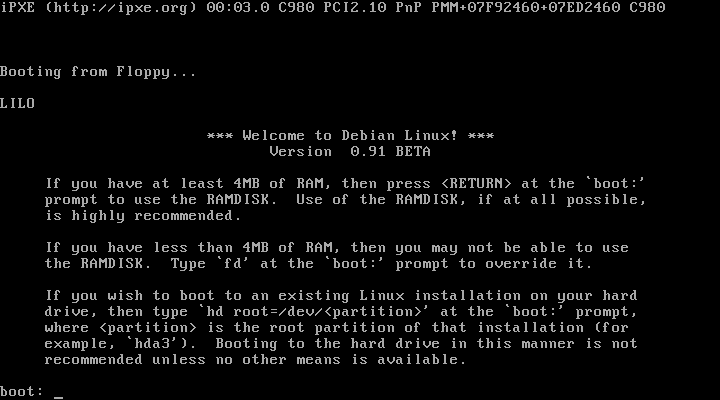
Press Enter to continue.
When you receive the “Welcome to Debian” prompt, run dinstall.
Preparing the Disks
Once dinstall loads, you will be presented with the installation menu:
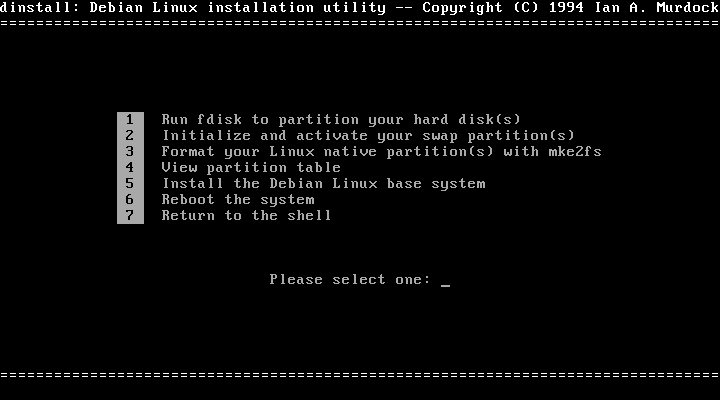
Select option 1 to partition the two disks. When asked “Which disk do you wish to partition?” enter hda. You will then need to create a partition on the disk. Type “n” when prompted for a command. Use the following answers for the prompts:
- Command action: “p” (primary partition)
- Partition number: “1”
- First cylinder: “1”
- Last cylinder: “101”
Once this is complete, type “w” to write the changes to disk. When prompted to reboot, choose “n” (no) since the second disk needs to be partitioned as well. Follow the same steps but enter “hdb” for the partition. Now you can reboot.
Follow the same steps to return to the dinstall menu. Now choose option #3 (Format your Linux native partition(s) with mke2fs). Run this option twice - once for hda1 and once for hdb1. You can select “n” (no) when prompted to check for bad blocks.
Installing Debian
We are now ready to install Debian. Select option #5 from the menu. Type “y” to continue with the installation. The first step is to mount the root partition. Type “m” and then “hda1” to select the first disk. Presss Enter to mount the partition at /root. Now press “c” to continue the installation.
The next question asks which floppy drive we are going to be using to install the base system. Type “fd0” to continue.
Now the tricky part: the boot disk is still in the virtual floppy drive but we need to change it to the base installation disk. In order to do that, we need to switch to the qemu console using Ctrl+Alt+2. Type:
change floppy0 base/basedsk1

Now press Ctrl+Alt+1 to return to the VM and press Enter. Repeat these steps for the second disk (base/basedsk2).
What follows is a sequence of questions:
- Root filesystem partition: “hda1”
- Swap partition: Enter
- Qualified hostname: “debian”
- Local doman name: “local”
- Additional network setup: “n” (no)
- System clock set to GMT: “y” (yes)
- Timezone: GMT
- Load non-US keymap: “n” (no)
- Modem setup: “5” (no modem)
- Mouse setup: “5” (no mouse)
- Custom boot disk: “n” (no)
Once the script completes, you can reboot into your new system. Choosing option #7 in the menu and typing “reboot” should do the trick.
Using the System
Once the reboot completes, you will once again be given the LILO boot prompt. This time use the following command instead of pressing Enter:
hd root=/dev/hda1
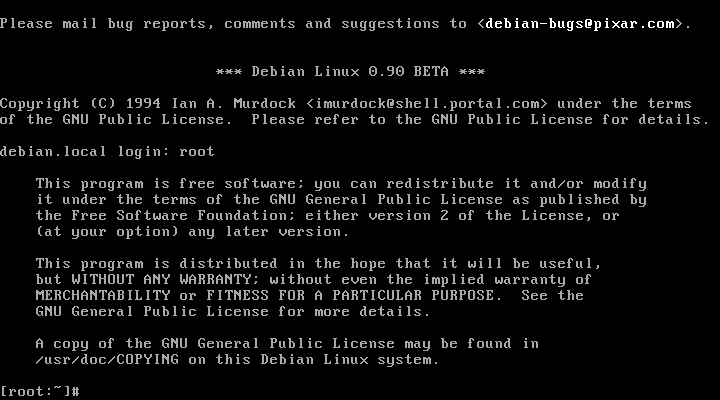
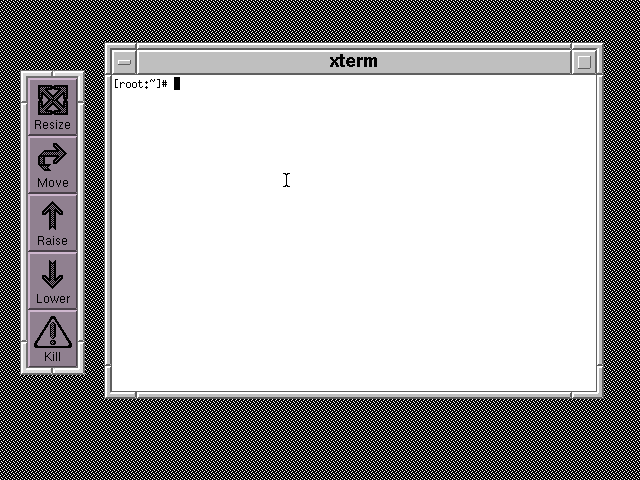
Type “root” at the debian.local login screen. You should immediately end up at a working Bash prompt:
Go ahead and explore the system!
[root:~]# uname -a
Linux debian.local 0.99.14t #1 Wed Jan 26 14:32:48 EST 1994 i586
Preparing the Packages Partition
Debian is well known for its package management system. In order to install packages, we’re going to need to copy them to the packages partition. Shut down the VM by running the “halt” command and then closing the qemu window when it finishes.
Now run the following commands:
mkdir mnt
sudo losetup -o 512 /dev/loop0 packages.raw
sudo mount /dev/loop0 mnt
sudo mkdir mnt/packages
sudo cp packages/*/*.deb mnt/packages
sudo umount /dev/loop0
sudo losetup -d /dev/loop0
rmdir mnt
This will copy all of the packages to the second hard drive image so that dpkg can use them.
Installing Packages
Boot the system again and run dpkg. The following menu is displayed:
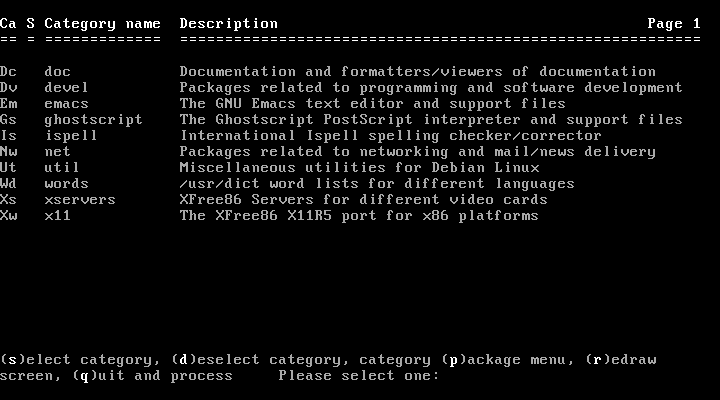
Type “s” to select a category and then “Dv” to select the development packages. Do the same for net, util, and x11. Type “s” and then “Xs” to view the list of X11 servers. Press “s” once again and type “84” to select the xvga16 package. Press “b” to go back and then “q” to quit.
To complete the installation, run the following command:
dpkg --process /dev/hdb1 ext2 packages
Press Enter to mount the partition and install the packages. Once it completes, press “q” and then Enter three times to continue.
You will be asked which binary to symlink to /usr/bin/X386/bin/X. Enter “XF86_VGA16” when prompted.
Launching X11
Before launching X11, we need to make a quick change to /usr/X386/lib/X11/Xconfig:
vi /usr/X386/lib/X11/Xconfig
Scroll down to the following line:
PS/2 "/dev/psaux"
Replace it with:
Microsoft "/dev/ttyS0"
Now you can run:
startx
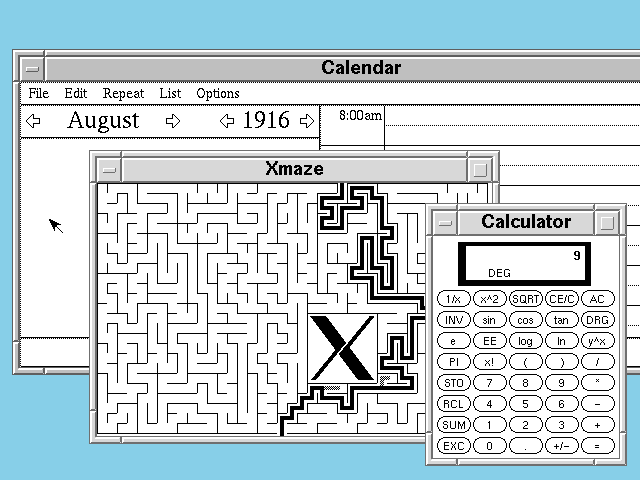
fvwm (a window manager) will then load:
Most of the interesting X11 apps are in /usr/bin/X11:
Summary
qemu is an incredibly flexible emulator. I continue to be amazed at how many commands and utilities that were in use 22 years ago are still with us today: fdisk, mount, vi, ifconfig, etc. It is also amazing that this all still manages to run in an emulator.